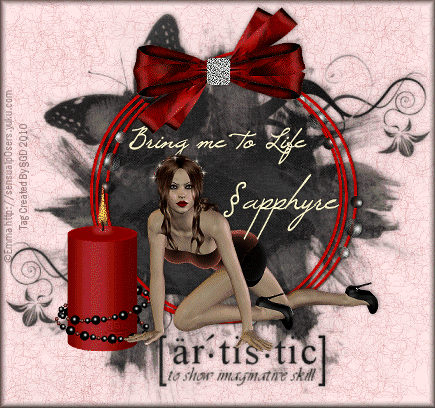
Click on the image above to view in full size.
Tut Title: Artistic Tendencies
Tut © By §apphyre Gemz Designz
Date: January 14, 2010
Kit Used: Scarlett Night By Emma
Posers: Amore ©Emma
*Thank You Emma hunnie for allowing me the use of your beautiful kit and posers *
Materials Needed:
PSP (I am using v. 9.01) you can get a free trial version HERE
Pieces of the kit I used were:
Paper 12
Frame 5
Bow 2
Candle 1
My Flame and Tiny Sparkle Zip HERE
Animation Shop you can get a current 30 day trial version HERE
Plugin: DBS Flux - Bright Noise
(optional, can also use Adjust -- Add / Remove Noise -- Add Noise adjusting
the different 3 layers using the 3 settings of Random, Uniform and Gaussian with noise set to 50% and monochrome checked).
Font of Choice (Here I used Windsong )
Ok, Let's Tag!
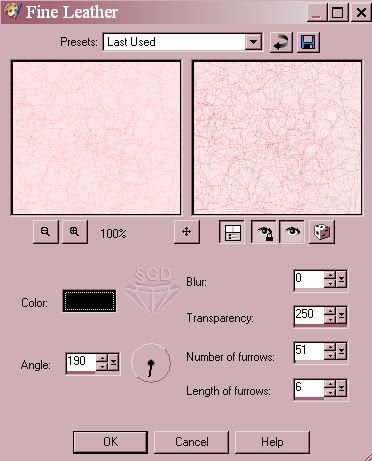
Step 1: Open a New Image 622x583 pixels, Transparent, 72 dpi. Rename this layer to Background. Flood fill with #f5eec5. Effects -- Texture Effects -- Fine Leather. Here I have used the following settings below:
(See Screenshot Below / Click on image to enlarge).
Save your image as a .pspimage in your chosen folder.
Step 2: Open up your Mask #355 from Vix. Back to your image, New Raster Layer, Name this layer Mask.
Selections -- Select All.
Open up your Paper 12 from the kit and Copy / Paste As Into Selection. Layers -- New Mask Layer -- From Image. Look for the Mask #355 in the pull down menu. (See Screenshot Below for Settings / Click to enlarge image).
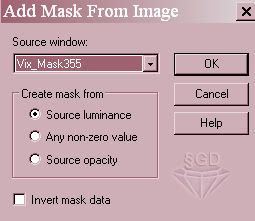
Click OK.
Step 3: Open up your Frame 5. Copy / Paste as a new layer. Rename this layer as Frame. Resize 70%.
Adjust - Sharpness - Sharpen. Place towards center of mask layer.
Step 4: Open up your Candle 1. Copy / Paste as a new layer. Rename this layer as Candle. Resize 70%,
place to the left bottom side of your frame.
Step 5: Open up your Flame tube from me. Copy / Paste as a new layer. Rename this layer as Flame 1.
Position it in place directly over the candle's wick. Once in place, right click on this layer in your layer pallette and duplicate 2 times. Rename other 2 flame layers as Flame 2, Flame 3. If you are using the plugin DBS Flux - Bright Noise...Set the Intensity to 50 and the Direction to Mix, click ok while on the Flame 1 layer. Highlight the Flame 2 layer, Effects - Plugins -- DBS Flux -- Bright Noise and click on the word Mix 2 times, Click OK. Highlight the Flame Layer 3 and repeat as for Flame 2 EXCEPT this time you will be clicking on the word Mix 3 times and Click OK.
Step 6: Open your Poser 4 image. Copy / Paste as a new layer. Rename this layer as Lady or Poser tube. Resize 70%. Move into place to the right of the Candle over the Frame layers.
Step 7: Unzip your Tiny white sparkle tube and add it to your tubes folder in PSP.
New Raster layer on your image, name this layer Sparkle 1. Set tube size to Enlarge your graphic tag to about 400 - 500% so you can see really well the Poser lady's headpiece. (We will have a total of 3 Sparkle layers) Place your first Sparkle around or on the first reddish dot on the lady's headpiece. Leaving 2 spaces continue all the way around the top of her headpiece. Once completed, new raster layer, named Sparkle 2 and repeat what you did for the 1st Sparkle layer. Finish up with a new raster layer, named Sparkle 3,
repeat the process as earlier.
Step 8: Open your Bow 2 tube. Copy / Paste as a new layer. Rename this layer as Bow. Move the Bow to
the top center of your frame. With your Freehand Tool, trace around the diamond clip in the center of the bow. Once you have the marching ants surrounding it all the way around, duplicate 3 times. Rename these layers as Bow Clip 1, Bow Clip 2 and Bow Clip 3.
Step 9: Highlight your Bow Clip 1 layer. Effects - Plugins - DBS Flux and follow as in Step 5.
Repeat for Bow Clips 2 and 3 clicking on the word MIX 2 times for layer 2 and 3 times for layer 3 of the Bow Clips.
Step 10: New Raster layer, name this layer as Tag Text, with your chosen font (here I used Windsong, with a Background color set to #eee7c0 and size set to 40 and stroke set to 1.0 Bold selected). Type out a text for your tag.
Step 11: New Raster layer, name it Names. Same font and settings EXCEPT the size will be changed to 50.
Type your name.
Step 12: Give each of your layers (minus the background layer) a Dropshadow with the following settings:
Vertical: -1, Horizontal: 1, Opacity: 50 Blur: 10 Color: #000000.
Step 13: Give each of your Text layers a Dropshadow. Same as in Step 11, EXCEPT the Opacity changes to 100 and the Blur changes to 2.
Step 14: Crop or resize your image if it's too large, then add a New Raster Layer. Go tto Effects -- Buttonize. Use the following settings: Height and Width: Both set to 10. Opacity set to 70, Edge set to Transparent. Click OK.
Step 15: New Raster Layer, name this layer Watermark / Copyright Info. Add needed watermark /
copyright info. I personally do these in Black (#000000) and set my Blend Mode for this layer to
Soft Light.
Your Tag is now Complete! Let's move on to Animation Shop now to get our tag animated!
You may have your own preferences when it comes to getting your images in Animation Shop,
but this is just how I do mine. I prefer what I call a Side-By-Side way to work, meaning
I have BOTH PSP open AND Animation Shop open and can move between the two of them.
Ok, let's go!
Step 1: You remember the layers I had you to Duplicate and rename as "whateverlayer 2", and
"whateverlayer 3"? Go thru your layer pallette and HIDE all of the layer 2 and layer 3 layers.
So you will have your regular main layers and all of your "whateverlayer 1"s all showing in view.
Step 2: Go to Edit -- Copy Merged. Flip over to Animation Shop. Right click and Paste as a New
Animation. Flip back over to PSP, hide "whateverlayer 1"s and unhide "whateverlayers 2"s. Repeat the
process we just completed in this step, EXCEPT when you get back to Animation Shop, you will need to
click on your 1st frame image and right click - paste after current frame. Hide 'whateverlayers 2"s
and unhide "whateverlayers 3"s and repeat. Once you have 3 frames in Animation Shop, we are set to
animate!
Step 3: Now click on the View Animation button. IF you are satisfied, save your image as a gif, give
it a name_BLANK (so you know you have the blank tag in case you make this tag for others).
Step 4: Here we will ADD the personalized names to our BLANK tag we just made. Flip back over to
PSP. Since you still have your template open, use it to size up your text. New raster layer. Type
out the name (your name) with the chosen font you like, here I chose Windsong, size: 48 -
color:#f3ecc3. Right click on THAT layer in your layer pallette. Copy. Flip back over to Animation
Shop. Right click on an empty space and Paste as a New Animation.
Step 5: Right click once again on your name in Animation shop, Cut. Now over to your blank
animation, you want the one showing 3 total frames, not the one that is moving. Highlight the 3
framed image, go to Edit -- Select All. Edit -- Propagate Paste. and finally Edit -- Paste into
Selected Frame. (This will put your name in each of the 3 frames without having to match or line it
up for the animation to flow smootly). Once that is done...click on Animate and save your new tag!
You are DONE!! YAY!!
I hope you have enjoyed this (lengthy) tutorial as much as I did creating it for you. IF you should encounter any difficulties along the way, please feel free to drop me a line sgd1970(AT)gmail.com remove the (AT) and place @ in your email, or click HERE with a subject line: Artistic Tendencies - Help!
*hugz*
§apphyre


No comments:
Post a Comment