Showing posts with label Lollipops N Gumdrops. Show all posts

Sunday, December 20, 2009

The Little Things


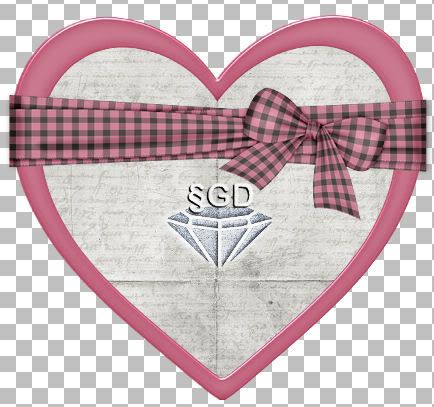
Click image above to view in full size.
©§GD December 20th, 2009
Thank you Lynne for allowing me the use of this beautiful kit!


Items used from the kit:

Butterfly Frame
Paper 5
Gem Flower 2

Other materials used:

Poser tube by Outlaw By Design (obdft127)
PSP you can get a free trial of the current version out HERE
for this tutorial this tag was created using version 9.01

OK, let's tag!
Remember to SAVE often as I won't be reminding you *smiles*

Step 1: Open up your needed pieces from the kit (or alternate ones you have chosen to use). Minimize in

PSP. Open up a New Image, I like room to work, we can resize it later. 700x700 pixels, Transparent
background.


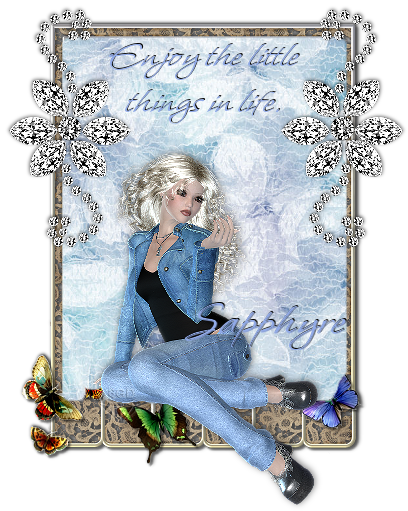
Step 2: Maximize the Butterfly Frame, copy / paste in a new raster layer. Resize by 65%. Rename this
layer as FRAME. With your Magic Wand Tool, click on the INSIDE of the frame, modify - expand 8 pixels,
click ok.


Step 3: Maximize the Paper 5. Copy / Paste as a new layer. Resize 65%. Selections - Invert. Hit your
Delete key. Rename this layer as FRAME BACK.


Step 4: Add a dropshadow to your FRAME layer with these settings:
Vertical: -1, horizontal: 1, opacity: 100, blur: 5, color: #000000 (black).


Step 5: Maximize Gem Flower 2. Copy / paste as a new layer. Resize 65%. Sharpen - sharpen. Add
dropshadow same as FRAME except lower the opacity setting down to 50. Rename this layer as FLOWER DECO. Move to the top of your FRAME. Duplicate - image - mirror. Layers - Merge - Merge down.


Step 6: Maximize your tube of choice. If using the same poser tube I have used, resize the tube 50% two
times. Add a dropshadow with these settings:
Vertical: -1, horizontal: 1, opacity: 50, blur: 10, color: #000000 (black).
Move into place of your choosing. Rename this layer as POSER or TUBE.


Step 7: With font of choice, type out your text in the top portion of your framed image. If you have the
Whisper font this is the settings I used: Size 30, no stroke. Font color: #91AAE8 and a dropshadow of
these settings: vertical: -1, horizontal: 1, opacity: 100, blur: 1, color: #000000 (black).


Step 8: Type out your name, here I used a size of 48, same settings as in step 7.


Step 9: Add your copyright info that may be needed and or your watermark. Save image as a .png file and
you are done!


I hope you have enjoyed this tutorial and will be back to check out more as they are created. If you
should have any troubles along the way, please feel free to drop me an email at sgd1970@att.net  with the
subject title of TAG TUT HELP.


Til next time....Happy PSP-ing!
*hugz*
§apphyre

Sunday, November 1, 2009

Beautiful Friendship


Click above image to view in full size.
©§GD on October 24, 2009.


Materials Needed:
PSP, I use version 9.01, trial version can be gotten HERE
Font of Choice ( I used Pristina)
Tube of choice (I am using a freebie tube from Outlaw By Design)
Beautiful scrapkit called My Everything By Sabrina of Scrap Moments Designz
Thank you to Sabrina for allowing me to work with this very pretty kit!
And Happy Anniversary coming up :)

Materials I used from this kit are:
smd me paper 15
smd me frame 01
smd me crisscross bow 01
smd me butterfly 01

REMEMBER to SAVE, SAVE, SAVE! As I won't be reminding along the way!

♥ Let's Tag! ♥

Step 1: Open up your needed tubes in PSP, minimize for now. Open new image 600x600 pixels, transparent.

Step 2: Maximize smd me frame 01. Copy / paste as a new layer. Close original. Image resize 75%. Name this layer FRAME.

Step 3: Maximize smd me paper 15. Copy, close original. Click the center of your FRAME with your magic wand tool. Selections - modify, expand 7 pixels, click ok. Right click on your graphic and paste as a new layer. Image - resize 75% two times. Selections - invert. Hit delete 1 time. Selections - select none. Rename this layer as PAPER. Move this layer underneath your frame layer.

Step 4: Maximize smd me crisscross bow 01. Copy, close original, paste as a new layer. Rename layer to BOW. Image - resize 78%. Move toward top of heart. See screenshot below for placement. Adjust sharpness - sharpen.

Click image above to view Screen shot in full view.


Step 5: Maximize smd me butterfly 01. Copy, close original, paste as a new layer. Rename layer to BUTTERFLY. Resize 50% two times. Adjust sharpness - sharpen. Dropshadow: vertical: 1, horizontal: -1, opacity: 50, blur: 1.00, color: black (#000000). Move butterfly to top center know of your bow. See screenshot for placement.


Click image above to view Screen shot in full view.


Step 6: Maximize your tube. Copy, close original, paste as a new layer. Now depending upon which tube you used, your resize will vary from mine. If using the same tube I am using, resize 50% two times. Move to left side of frame. Rename layer to TUBE. Dropshadow as in step 5.

Step 7: With font of choice, size according to your font (you want text to fit "inside" of your frame. New raster layer, name it text. Here I used Pristina, size 36, no stroke. color: #C26880. Using your raster deform tool, rotate your text slightly to the left. Add a dropshadow as in step 5, except on the blur change it to 0. Move your text layer in your layer pallette down underneath your TUBE layer.

Step 8: Go back to your FRAME layer, add a dropshadow as in step 5, but change the opacity to 100 and the blur to 10.

Step 9: New raster layer, add any copyright info / watermark to this layer, final save (as a .png file so you can use your tag over and over, just adding names to new raster layers) crop your tag down in size as close to the image as you can without cutting off the shadowing. And you are done! YAY!

I hope you have enjoyed this tutorial and will be back to try out more as they are written :)

If you should have any troubles, please feel to email me here at sapphyre@gmx.com with a subject line of TAG TUT HELP and I will be more than glad to help you out.

Hugz!
§apphyre

Tuesday, October 13, 2009

* Mystical Moonlight *


Click above to view in full size.
Mystical Moonlight ©§GD on October 13, 2009


Materials Needed:
PSP, I use version 9.01. For a trial version of PSP, click HERE
(Awesome kit Kesha! Thanks so much for allowing me to work with it!)
Pieces I used from this kit are:
paper 13
star rain
tree
fairy 1
paper 4
bow wrap

Font of Choice (I used A&S Signwriter) you can get it here.

Remember to SAVE often as I won't be reminding you!

♥ Let's Tag! ♥

Step 1:  Open PSP and unzip Fairy Good Night Kit, minimizing pieces listed above.
Open a new image, 426x525 pixels, transparent. Flood fill with color #404040. Maximize paper 13, copy / paste as a new layer. Resize 65%. Arrange paper to your liking on your canvas for the moon to be around the top left corner. Lower the opacity to 50%. Layers merge - merge down. Rename this layer BG.

Step 2: Maximize Star Rain. Copy / paste as a new layer. Resize 50%. Adjust sharpness - sharpen more. Dropshadow: Vertical: -1, horizontal: 1, opacity: 100, blur: 10 color: #000000 (black)

Step 3: Maximize Tree. Copy / paste as a new layer. Resize 50%. Adjust sharpness - sharpen. Same dropshadow as in Step 2.

Step 4: Maximize Fairy 1. Copy / paste as a new layer. Resize 50% three times total. Adjust sharpness - sharpen more. Dropshadow as in Step 2. Layers - merge - merge all.

Step 5: Selections - select all.  Selections - modify - contract. Contract 15 pixels. Selections - invert. Maximize Paper 4. Copy / paste into selection on your tag image. Effects - inner bevel. Bevel # 12, width: 8, smoothness: 0, depth: 8, ambience: 0, shininess: 0, color: #FFFFFF (white), angle: 315, intensity: 50, elevation: 30. Click OK.

Step 6: Selections - invert. Effects - 3D effects - cutout. Vertical / Horizontal: 0, opacity: 85, blur: 28, color: #000000 (black), click OK. Selections - select none.

Step 7: Maximize Bow Wrap. Copy / paste as a new layer. Resize 50%. Rename to BOW. Move BOW to the bottom of the tag. See tag for placement. Adjust sharpness - sharpen more. Dropshadow as in Step 2.

Step 8: New raster layer. Add your text. Here I used A&S Signwriter, size 22, color #25256B.
Add dropshadow with these settings: vertical: -1, horizontal: 1, opacity: 50, blur: 5.00, color: # FFFFC0.

Step 9: New raster layer. Add your name. Here I used same font as in Step 8, but changed the size to 48. Same color used as in Step 8. Dropshadow as in Step 8.

Step 10: New raster layer. Add your needed copyright info and / or your watermark. Export file as a .jpg file and name your tag and you are done!

YAY! You did it!
Thank you so much for trying out this tag tut! I hope you have enjoyed it and will check back for more tuts soon! If you should have any troubles, please feel free to email me at sgd247@att.net or Sapphyre@gmx.com with a subject line of TAG TUT HELP. I will get back to you asap and offer any help I can to you! Thanks again!

*Hugz*
§apphyre