Sunday, October 25, 2009

Creepy Crawlie Alert!


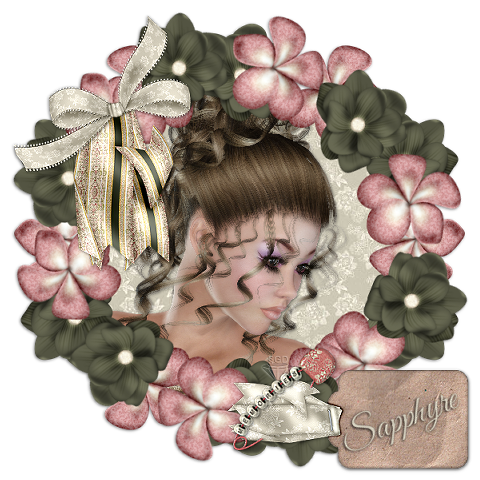
Click above image to view in full size.

Creepy Crawlie Alert ©§GD on October 25, 2009.


Materials Needed:
PSP, I use version 9.01, you can get a trial version HERE
Animation Shop (This comes pre-packaged with PSP v8) may be downloaded HERE
Thanks SO much Julie for an awesome kit to work with!
The pieces of the kit I used are:
BNB Element 2
BNB Element 19
BNB Element 20
BNB paper 6
Melli 9
Fonts of your choice. (I used Impact for Text & Rage Italic for Names)
Need one to be a wide font and one to be a slightly fancy font.


REMEMBER to SAVE, SAVE, SAVE! As I won't be reminding along the way!


♥ Let's Tag! ♥


Step 1: Open up the needed pieces (see above) in PSP. Minimize for now. Open up a New Image 600x600 pixels, transparent. Maximize, Copy, close out the original of BNB Element 19. Paste as a new raster layer onto your image. Rename this layer to Black Flower. Resize 55%, move to top center of your canvas. Image, Duplicate, Image - Flip. Right click on your "copy" and duplicate, move to the right side (at the 3 o'clock position). Duplicate, Image - Mirror. Duplicate, move flower to the 2 o'clock position. Duplicate, Image - Flip. Duplicate, Image - Mirror. Duplicate, Image - Flip. Now you should have a total of 8 black flowers. Layers - Merge - Merge Visible. Rename Black Flowers.

Step 2: Maximize BNB Element 20. Copy, close orginal, paste as a new layer. Rename Red Flower. Resize 55%. Place this 1st red flower between the 1st 2 top black flowers. Duplicate, Image - Flip. Back to the Red Flower labelled layer, Duplicate, move flower between second and thrid black flower. Duplicate, Image - Flip. Layers - Merge - Merge Visible. Duplicate, Image - Mirror. Layers, Merge - Merge Visible. Rename this layer to Red Flowers. Layers Merge- Merge Visible. Rename to Flower Frame.

Step 3:  Maximize BNB Paper 6. Copy, close original and paste as a new layer. Rename this layer as Frame BG. Drag this layer UNDER your Flower Frame layer. Highlight your flower frame layer, with your Magic Wand Tool, click on the OUTSIDE of your frame. Selections - Invert. Selections - Contract. Contract 20 pixels.Selections - Invert. Hit your Delete key. Selections - Select None.

Step 4: Maximize BNB Element 2. Copy, close original, paste as a new layer. Rename this layer Spider and Web. Drag this layer UNDER your Frame layer and ON TOP of your Frame BG layer. Follow the Selections Step as in Step 3. This will erase all of the overhanging of the spider web that will show thru extending past your flower frame.

Step 5: Maximize Melli 9. Copy, close original, paste as a new layer. Rename to Witch. Move to the bottom right side of your flower frame. (See tag for placement if need to). Adjust sharpness - sharpen.

Step 6: These layers we wil give Dropshadows to: Your Flower Frame layer, your Witch layer.
Dropshadow settings: Vertical: 1, Horizontal: -1, Opacity: 100, Blur: 10.00, Color: Black (#000000).
Layers, Merge - Merge Visible. Rename TAG.

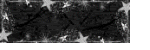
Step 7: Resize 70%, Resize All Layers: Checked. Click OK. With your Pen Tool, any color, any width line. We are going to "draw" a diagonal line slightly above center from the bottom left to the top right flowers in our Flower Frame. (This will be a guide for our text placement). Once you have your line drawn, click on the little check mark to activate the line. You should now have a Vector layer. With your Text Tool. You want a Wide type of font for the wording. Here I used Impact, size 28 color: #a50300, Type out your text in all capital letters. You should be typing at a diagonal. If not, cancel and make sure your Vector layer is highlighted. Then begin typing again. (You want to be sure to stay INSIDE the borders of the flowers). Once your text is complete, you need to PROMOTE this layer to a raster layer. Close off your Vector layer. Highlight text layer, Dropshadow as in Step 6 EXCEPT adjust your Opacity to 50 and Blur to 5.00.  and  Adjust - Add Noise. Uniform, 35% and Monochrome checked. Click OK. Duplicate this layer. Now on your duplicate layer of your text, go to Adjust - Color Balance - Manual Color Correction. (See Screenshot below) Look for the box that says COLORS: Source color : set to #A50300 and your Target color: set to #A8A54F. Preset Target Color Selected.  Fruits selected / highlighted.


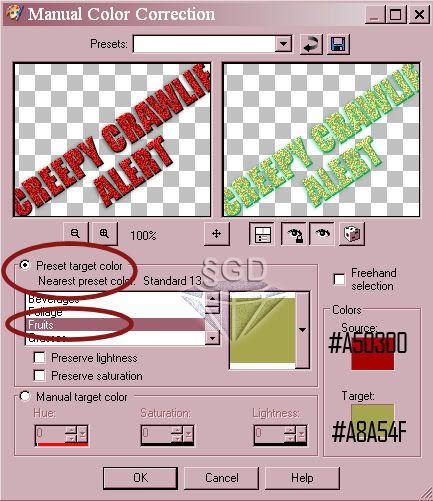
Click Screenshot image above to view in full size.


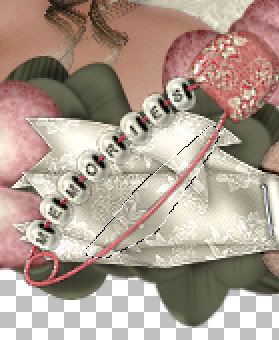
Step 8:  New Raster Layer. Name this layer NAME. With your slightly fancy font type out your name with a Stroke color of 1.0 Size of font will vary depending on which font you are using. Here I used Rage Italic, set to size 48, stroke: 1.0, with these colors: Foreground: #7a0b0b , Background: #000000. Add a dropshadow as in Step 6. New Raster layer. Add your watermark and or copyright info you may need to each on their respective layers.

Step 9: Open Animation Shop. Hide ALL layers in PSP Except for these layers. You Tag Image, your Text in Red, and your name and Watermark / copyright layers. Right click on your image. Copy - Copy Merged. Over to Animation Shop (AS for short). Right click - paste as a new animation. Back over to PSP. Hide your RED text layer and unhide your GREEN text layer. Right click on your image - copy - copy merged. Back to AS. Right click on your 1st frame in AS, Paste - after current frame. Click on Edit - Select All.  Animation - Frame Properties, set to 45, Click OK. Click on Animate. File - Save As, name your graphic.
When you get to a dialog box that says Animation Quality Versus Putput Size, click on Customize button on the bottom of the box. Make sure your settings reflect these below:

Colors Tab:
Color 255
Create Pallette By: Optimized Median Cut
Reduce Colors By: Error Diffusion

Optimizations Tab:
Checkmark boxes 2,3,4.

Partial Transparency Tab:
Convert Pixels less than 60
Yes, blend with color: #FFFFFF (white)
Click OK.
Click Next 3 times.
Click Finish.

YAY! You are now done!

I hope you have liked this tutorial and will be back to check out more I will have for you soon!

If you should have any problems, please feel free to email me here at sgd247@att.net or my alt email at sapphyre@gmx.com with a subject heading of TAG TUT HELP and I will be more than glad to help you out anyway I can!

*Thanks*

Hugz!
§apphyre

Thursday, October 22, 2009

Sweet Memories


Click above to view in full size.

Sweet Memories ©§GD on October 22, 2009


Materials Needed:
PSP, I use version 9.01. For a trial version of PSP, click HERE
Scrap kit called Exquisite by Bits 'N' Bobs
(Thanks Julie for this beautiful kit to work with)

Pieces I have used are:
BNB Flower
BNB Flower 4
BNB Bow 4
BNB Folded Ribbon 2
BNB Tag 1
BNB Pin 1

Font of your Choice (I am using Good Vibrations ROB)
Tube of your choice. I am using a "freebie" from Outlaw By Designs

REMEMBER to SAVE, SAVE, SAVE! As I won't be reminding along the way!

♥ Let's Tag! ♥


Step 1: Open a new Raster Layer 600x600 pixels, transparent. Rename this layer as BG (for background).

Step 2: Open up BNB-Flower and BNB-Flower-4. Working with BNB-Flower-4 first...copy / close original and paste as a new layer onto your BG canvas. Resize 50%. Rename to FLOWER 1. Move to the left side of your canvas a little over 1/2 way up towards the top of your canvas. Right click, Duplicate. Image - Mirror. Highlight FLOWER 1, Duplicate, Image - Flip. Duplicate, Image - Mirror. Highlight FLOWER 1 again, Duplicate, move the copy towards the top center position, Duplicate, Image - Flip. Hide your BG layer. Layers - Merge - Merge Visible. Rename as FLOWER 1 (again). Duplicate, Image - Rotate - Free Rotate. To the Right and 45. Right click - Arrange - Move to top.

Step 3: Working with BNB-Flower now. Copy / PAste as a new layer onto your BG image. Resize 50%. Rename to FLOWER 2. Move FLOWER 2 to top between the 2 flowers on the top right hand side of your frame. Duplicate, Image - Mirror. Duplicate, Image - Flip. Duplicate, Image - Mirror. Duplicate and move copy to empty space on the right. Duplicate, Image - Mirror. Hide FLOWER 1 and BG layers. Layers - Merge - Merge Visible. Rename merged layer as FLOWER 2 (again). Unhide FLOWER 1, keeping BG hidden still, Merge-Merge Visible. Rename merged layer to FLOWER FRAME.

Step 4: With Magic wand tool, click on the center of the FLOWER FRAME. Selections - Modify - Expand. Expand 15 pixels. Click OK. Open up BNB-PAPER2. Copy / paste as a new layer, move this layer under your FLOWER FRAME layer. Selections - Invert. Press Delete 1-2 times. Selections - Select None. Rename this layer as FRAME BG.

Step 5: Open your tube of choice (your person / people tube) here I used a tube by Outlaw By Designs - outlawbydesignft165 (a free tube). Copy / paste as a new layer. Resize 50% 2x. Move into place where you'd like your tube to be.

Dropshadow: Vertical / Horizontal: both set to 1, Opacity: 50, Blur: 5.00 and color: black (#000000). Rename this layer GIRL.


Step 6: With your magic wand tool, highlight your FLOWER FRAME layer. Click your wand outside the frame. Selections - Modify 5 pixels. Click OK. Highlight GIRL layer. Press Delete. Selections - Select None.

Step 7: Open BNB-BOW-4. Copy / Paste as a new layer. Resize 75%. Move to top left of your FLOWER FRAME. Rename this layer BOW. Adjust - sharpen-sharpen. Dropshadow same as in step 5.

Step 8: Open bnb-folded-ribbon-2. Copy/paste as a new layer. Resize 75%. Adjust-sharpen-sharpen. Rename this layer as STREAMER. Move your STREAMER layer underneath your BOW layer in your layers pallette. With your eraser tool, erase the tiny edge that shows over the top edge of your BOW layer. Dropshadow as in step 5.

Step 9: Open BNB-Tag-1. Copy / paste as a new layer. Resize 75%. Image-rotate-free rotate. Left and 90. Adjust sharpen - sharpen. Rename layer to TAG. Move tag to the bottom right of your FLOWER FRAME. Add dropshadow as in step 5. Rename this layer as TAG.

Step 10: Open BNB-PIN-1. Copy / paste as a new layer. Rename to PIN. Resize 75% , repeat resize.. Rotate-free rotate. Left and 45. Adjust sharpness-sharpen more. Zoom in to your image to about 200%. With your freehand tool, select part of the pin that is laying across your tag's ribbon. (See screenshot for placement). Hit Delete one time. Zoom back out to 100% and selections - select none. Dropshadow as in step 5.
Screenshot below:


(Click image above to view in full size).
The dotted line area is the area we are REMOVING from the PIN.

Step 11: With your background color set to #D1CCBB, activate your text tool. Font of your choice (here I am using Good Vibrations ROB) set to a size 36, no stroke. (You can go up or down in the size of your font according to the length of your name and style of font chosen). Type out your name. Using your Raster Deform tool, use the turner node and rotate your name around until it fits nicely going diagonally on your tag.

 Dropshadow: vertical: 1, horizontal: -1, opacity: 100, blur: 5.00. color: black (#000000). Rename this layer to NAME. Hide NAME layer. Layers - merge-merge visible.

Dropshadow: vertical:1, horizontal: -1, opacity: 50, blur: 5.00, color: black (#000000). (Now you can use this tag over and over and just add names later that are different from yours).

Step 12: Resize your completed tag, ALL layers checked 80%. Add your watermark and any other copyright info as needed each on separate layers. Save your completed tag as a .png file and you are done!


YAY! You did it!


Thank you so much for trying out this tag tut! I hope you have enjoyed it and will check back for more tuts soon! If you should have any troubles, please feel free to email me at sgd247@att.net or Sapphyre@gmx.com with a subject line of TAG TUT HELP. I will get back to you asap and offer any help I can to you! Thanks again!


*Hugz*
§apphyre

Tuesday, October 13, 2009

* Mystical Moonlight *


Click above to view in full size.
Mystical Moonlight ©§GD on October 13, 2009


Materials Needed:
PSP, I use version 9.01. For a trial version of PSP, click HERE
(Awesome kit Kesha! Thanks so much for allowing me to work with it!)
Pieces I used from this kit are:
paper 13
star rain
tree
fairy 1
paper 4
bow wrap

Font of Choice (I used A&S Signwriter) you can get it here.

Remember to SAVE often as I won't be reminding you!

♥ Let's Tag! ♥

Step 1:  Open PSP and unzip Fairy Good Night Kit, minimizing pieces listed above.
Open a new image, 426x525 pixels, transparent. Flood fill with color #404040. Maximize paper 13, copy / paste as a new layer. Resize 65%. Arrange paper to your liking on your canvas for the moon to be around the top left corner. Lower the opacity to 50%. Layers merge - merge down. Rename this layer BG.

Step 2: Maximize Star Rain. Copy / paste as a new layer. Resize 50%. Adjust sharpness - sharpen more. Dropshadow: Vertical: -1, horizontal: 1, opacity: 100, blur: 10 color: #000000 (black)

Step 3: Maximize Tree. Copy / paste as a new layer. Resize 50%. Adjust sharpness - sharpen. Same dropshadow as in Step 2.

Step 4: Maximize Fairy 1. Copy / paste as a new layer. Resize 50% three times total. Adjust sharpness - sharpen more. Dropshadow as in Step 2. Layers - merge - merge all.

Step 5: Selections - select all.  Selections - modify - contract. Contract 15 pixels. Selections - invert. Maximize Paper 4. Copy / paste into selection on your tag image. Effects - inner bevel. Bevel # 12, width: 8, smoothness: 0, depth: 8, ambience: 0, shininess: 0, color: #FFFFFF (white), angle: 315, intensity: 50, elevation: 30. Click OK.

Step 6: Selections - invert. Effects - 3D effects - cutout. Vertical / Horizontal: 0, opacity: 85, blur: 28, color: #000000 (black), click OK. Selections - select none.

Step 7: Maximize Bow Wrap. Copy / paste as a new layer. Resize 50%. Rename to BOW. Move BOW to the bottom of the tag. See tag for placement. Adjust sharpness - sharpen more. Dropshadow as in Step 2.

Step 8: New raster layer. Add your text. Here I used A&S Signwriter, size 22, color #25256B.
Add dropshadow with these settings: vertical: -1, horizontal: 1, opacity: 50, blur: 5.00, color: # FFFFC0.

Step 9: New raster layer. Add your name. Here I used same font as in Step 8, but changed the size to 48. Same color used as in Step 8. Dropshadow as in Step 8.

Step 10: New raster layer. Add your needed copyright info and / or your watermark. Export file as a .jpg file and name your tag and you are done!

YAY! You did it!
Thank you so much for trying out this tag tut! I hope you have enjoyed it and will check back for more tuts soon! If you should have any troubles, please feel free to email me at sgd247@att.net or Sapphyre@gmx.com with a subject line of TAG TUT HELP. I will get back to you asap and offer any help I can to you! Thanks again!

*Hugz*
§apphyre

* To the Mall! *


Click above to view in full size.
To the Mall! ©§GD on October 11, 2009


Materials Needed:
PSP you can get a Free Trial version here.
LP Bonus Car from TinyD's Scrappin' Designs as a freebie at the link above.
Font of Choice (I used A&S Signwriter) you can get it here.
Mask #353 From Weescotslass Creations (third mask from the top)
Animation Shop you can download a trial version of 3.05 here and
you can purchase if you don't already have it, a full version here.
Plugin DBS Flux you can get it here.

Remember to SAVE often as I won't be reminding you!

♥ Let's Tag! ♥

Step 1: Open PSP and unzip your files from the Legally Pink kit.
These are the files I have used from the kit:
TD_LP_pp12
SSLisa - Cookie - Elfdance Flirty - Pink 2
lp bonus car
TD_LP_arrow

Step 2: Open a new image 500x500 pixels, transparent checked. Maximize TD_LP_pp12. Copy / paste as a new layer. Layers - New Mask Layer from Image from the source window pull down menu, look for your mask. Source luminance checked, invert mask unchecked. Press OK. Layers - Merge Group. Rename this layer Tag Back. Duplicate this layer a total of 2 times. (You should now have 3 of the same layer). Close off 2 of the duplicate layers. Highlight your main layer, Effects - Plugins - DBS Flux - Bright Noise
Intensity: 30
Direction: Mix
Click OK.


Close off your main layer and now unhide / highlight one of your duplicate layers. Same settings as before BUT this time you will click on the word MIX 2 times. Click OK. Hide duplicate layer and unhide / highlight your last duplicated layer. Same plugin as before BUT this time click on the word MIX 3 times. Click OK.


Step 3: Maximize TD_LP_arrow. Copy / paste as a new layer, close original. Rename this layer ARROW.  Resize 75% two times. Add a drop shadow: Vertical: -1, horizontal: 1, opacity: 50, blur: 5.00, color: #000000 (black). Move your arrow into place. See tag for placement. New raster layer: add some text to your arrow. Here I used A&S Signwriter, size 26, black for the font color. Once you get your text typed. Go to Image - Rotate - Free Rotate. Right and Free 45. Click OK. Add same drop shadow as earlier.


Step 4:  Maximize SSLisa - Cookie - Elfdance Flirty - Pink 2. Copy, close original and paste as a new layer. Resize by 75%. Adjust  - Sharpness - Sharpen More. Move to the left bottom side of your tag. see tag for placement. Rename this layer to GIRL. With your selection tool set to Rectangle, draw a small box around ©Lisa, cut and paste as a new layer, selections - select none. Move closer to your GIRL. Now GIRL layer only!....give a drop shadow as in Step 3.

Step 5: Maximize lp bonus car. Copy, close original and paste as a new layer. Resize 75% 3 times. Adjust  - Sharpness - Sharpen. Place at the bottom right hand side of your tag. (See tag for placement). Add new raster layer. Type your name. Here I used A&S Signwriter font size 36. Add a dropshadow as in Step 3.

Step 6: New raster layer. Add any copyright info you may need to or your watermark.

Step 7: Open up Animation Shop. Hide 2 of your mask layers. Right click on your image, copy - merged.
Over to Animation Shop (AS for short). Paste as a New Animation. Back to PSP. Hide the mask you had opened, and unhide mask number 2. Same process as before, back to AS, right click on your image in AS and paste after current frame. Back to PSP. Hide mask number 2 and unhide mask number 3. Same process as earlier. Back to AS. Right click on image, paste after current frame. Now once all three images have been added, click on your View animation button. If you are happy with the output, click on File - Save As. Name your tag and you are done!

YAY! You did it!
I hope you have enjoyed this tutorial and will be back to check out more I will have up very soon!

If you should have any troubles with this tutorial, please feel free to send me an email to sgd247@att.net or sapphyre@gmx.com with TAG TUT HELP as the subject and I will get back to you with any help that is needed! Thanks again!

*Hugz*
§apphyre

Saturday, October 3, 2009

* Just Doodlin' *


Please click on the image above to view it at full size.

Just Doodlin' ©§GD on October 1, 2009

Materials Needed:
PSP you can get a Free Trial version here.
Font of Choice (I used Curlz MT you can get it here)

Remember to SAVE often as I won't be reminding you!

♥ Let's Tag! ♥

Step 1: Open PSP and unzip your files from the Legally Pink.
These are the files I have used from this kit:

TD_LP_PP34
TD_LP_Hartfetti
TD_LP_Stars
SSLisa-Cookie_Elfdance Flirty_Pink 2
Minimize all for now in PSP.

Step 2: Open a New Image - 600x600 pixels - 300.00 dpi-Transparent.
This will give us some working room. Name this layer as CANVAS or BG for background, flood fill with a med-dark color of choice. This is so we can see our work as we continue along, this layer later will be deleted. So any dark color will work for the background.

Step 3: Maximize TD_LP_Hartfetti. Copy, close out the original.
Paste as a New Layer on your BG image. Name this layer HEARTS.
Resize the HEARTS layer by 50%. Image - Mirror. Layers - Merge Down.
Right click on the HEARTS layer, Duplicate. Image - Flip. Layers - Merge Down.

Step 4: Maximize TD_LP_Stars. Copy, close out original.
Paste as a New Layer on your working image. Name this layer STARS.
Move to the far right of your image, close to but not right at the edge.

Step 5: Maximize SSLisa_Cookie_Elfdance Flirty_Pink2. Copy, close original.
Paste as a New Layer on your working image. Resize 80%. Rename to GIRL.
Move your GIRL image towards the bottom of your HEARTS image.
(See Tag for placement)

Step 6: Give each of your layers:
Hearts, Stars, and Girl a dropshadow with these settings:
Vertical: 1, Horizontal: 1, Opacity: 50, Blur: 2.00, color: Black (#000000)
Hit OK.

Step 7: Hiding your BG Layer, Go to Layers - Merge - Merge Visible.
Resize - 65% All layers checked.

Unhide your BG Layer now and minimize TD_LP_PP34. Copy, close original and Paste as a New Layer ABOVE your BG Layer in your Layers Pallette. Name this layer PAPER. Resize 65%. Move into place so that the 2 holes in your notebook paper show on your image. (See Tag for placement).

Delete your BG Layer (the med-dark color you chose at the beginning). Give your PAPER layer the same dropshadow as in Step 6.

Step 8: Add your name with your chosen font, adjusting size. (With the font I used, I used Curlz Mt, font size 48). Give your name the same dropshadow as in Step 6.

Step 9: Add a new layer for any copyright info you may need and / or your watermark.
Adjust the blend mode to your liking.

Step 10: Save as a .png file by using File - Export - PNG Optimizer.
The settings I use for my .png files are as follows:
Colors Tab: 16.7 Million Colors (24 bit)
Transparency Tab: Alpha Transparency & Existing Image or Layer Transparency.
Gamma Tab: I leave it as is.
Format Tab: Non-Interlaced.
Download Times Tab: Leave as is.
Click OK and you are done!

YAY! You did it!
I hope you have enjoyed this tutorial and will be back to check out more I will have up soon!

If you should have any troubles with this tutorial, please feel free to email me at sgd247@att.net OR sapphyre@gmx.com with a subject title of TAG TUT HELP and I will get back to you with any help needed! Thanks again!

*Hugz*
§apphyre