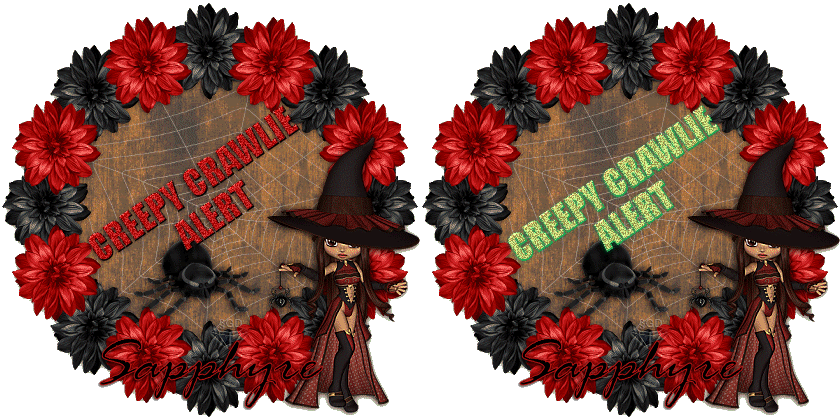
Click above image to view in full size.
Creepy Crawlie Alert ©§GD on October 25, 2009.
Materials Needed:
PSP, I use version 9.01, you can get a trial version HERE
Animation Shop (This comes pre-packaged with PSP v8) may be downloaded HERE
Thanks SO much Julie for an awesome kit to work with!
The pieces of the kit I used are:
BNB Element 2
BNB Element 19
BNB Element 20
BNB paper 6
Melli 9
Need one to be a wide font and one to be a slightly fancy font.
REMEMBER to SAVE, SAVE, SAVE! As I won't be reminding along the way!
♥ Let's Tag! ♥
Step 1: Open up the needed pieces (see above) in PSP. Minimize for now. Open up a New Image 600x600 pixels, transparent. Maximize, Copy, close out the original of BNB Element 19. Paste as a new raster layer onto your image. Rename this layer to Black Flower. Resize 55%, move to top center of your canvas. Image, Duplicate, Image - Flip. Right click on your "copy" and duplicate, move to the right side (at the 3 o'clock position). Duplicate, Image - Mirror. Duplicate, move flower to the 2 o'clock position. Duplicate, Image - Flip. Duplicate, Image - Mirror. Duplicate, Image - Flip. Now you should have a total of 8 black flowers. Layers - Merge - Merge Visible. Rename Black Flowers.
Step 2: Maximize BNB Element 20. Copy, close orginal, paste as a new layer. Rename Red Flower. Resize 55%. Place this 1st red flower between the 1st 2 top black flowers. Duplicate, Image - Flip. Back to the Red Flower labelled layer, Duplicate, move flower between second and thrid black flower. Duplicate, Image - Flip. Layers - Merge - Merge Visible. Duplicate, Image - Mirror. Layers, Merge - Merge Visible. Rename this layer to Red Flowers. Layers Merge- Merge Visible. Rename to Flower Frame.
Step 3: Maximize BNB Paper 6. Copy, close original and paste as a new layer. Rename this layer as Frame BG. Drag this layer UNDER your Flower Frame layer. Highlight your flower frame layer, with your Magic Wand Tool, click on the OUTSIDE of your frame. Selections - Invert. Selections - Contract. Contract 20 pixels.Selections - Invert. Hit your Delete key. Selections - Select None.
Step 4: Maximize BNB Element 2. Copy, close original, paste as a new layer. Rename this layer Spider and Web. Drag this layer UNDER your Frame layer and ON TOP of your Frame BG layer. Follow the Selections Step as in Step 3. This will erase all of the overhanging of the spider web that will show thru extending past your flower frame.
Step 5: Maximize Melli 9. Copy, close original, paste as a new layer. Rename to Witch. Move to the bottom right side of your flower frame. (See tag for placement if need to). Adjust sharpness - sharpen.
Step 6: These layers we wil give Dropshadows to: Your Flower Frame layer, your Witch layer.
Dropshadow settings: Vertical: 1, Horizontal: -1, Opacity: 100, Blur: 10.00, Color: Black (#000000).
Layers, Merge - Merge Visible. Rename TAG.
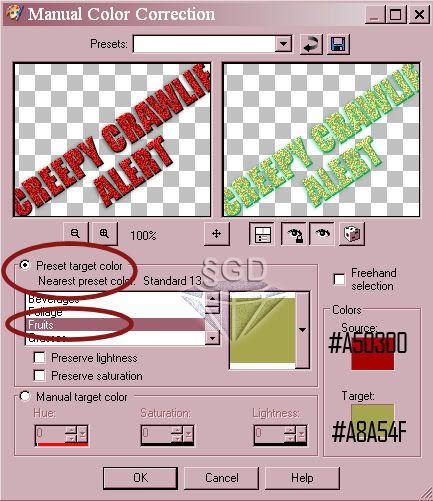
Step 7: Resize 70%, Resize All Layers: Checked. Click OK. With your Pen Tool, any color, any width line. We are going to "draw" a diagonal line slightly above center from the bottom left to the top right flowers in our Flower Frame. (This will be a guide for our text placement). Once you have your line drawn, click on the little check mark to activate the line. You should now have a Vector layer. With your Text Tool. You want a Wide type of font for the wording. Here I used Impact, size 28 color: #a50300, Type out your text in all capital letters. You should be typing at a diagonal. If not, cancel and make sure your Vector layer is highlighted. Then begin typing again. (You want to be sure to stay INSIDE the borders of the flowers). Once your text is complete, you need to PROMOTE this layer to a raster layer. Close off your Vector layer. Highlight text layer, Dropshadow as in Step 6 EXCEPT adjust your Opacity to 50 and Blur to 5.00. and Adjust - Add Noise. Uniform, 35% and Monochrome checked. Click OK. Duplicate this layer. Now on your duplicate layer of your text, go to Adjust - Color Balance - Manual Color Correction. (See Screenshot below) Look for the box that says COLORS: Source color : set to #A50300 and your Target color: set to #A8A54F. Preset Target Color Selected. Fruits selected / highlighted.
Click Screenshot image above to view in full size.
Step 8: New Raster Layer. Name this layer NAME. With your slightly fancy font type out your name with a Stroke color of 1.0 Size of font will vary depending on which font you are using. Here I used Rage Italic, set to size 48, stroke: 1.0, with these colors: Foreground: #7a0b0b , Background: #000000. Add a dropshadow as in Step 6. New Raster layer. Add your watermark and or copyright info you may need to each on their respective layers.
Step 9: Open Animation Shop. Hide ALL layers in PSP Except for these layers. You Tag Image, your Text in Red, and your name and Watermark / copyright layers. Right click on your image. Copy - Copy Merged. Over to Animation Shop (AS for short). Right click - paste as a new animation. Back over to PSP. Hide your RED text layer and unhide your GREEN text layer. Right click on your image - copy - copy merged. Back to AS. Right click on your 1st frame in AS, Paste - after current frame. Click on Edit - Select All. Animation - Frame Properties, set to 45, Click OK. Click on Animate. File - Save As, name your graphic.
When you get to a dialog box that says Animation Quality Versus Putput Size, click on Customize button on the bottom of the box. Make sure your settings reflect these below:
Colors Tab:
Color 255
Create Pallette By: Optimized Median Cut
Reduce Colors By: Error Diffusion
Optimizations Tab:
Checkmark boxes 2,3,4.
Partial Transparency Tab:
Convert Pixels less than 60
Yes, blend with color: #FFFFFF (white)
Click OK.
Click Next 3 times.
Click Finish.
YAY! You are now done!
I hope you have liked this tutorial and will be back to check out more I will have for you soon!
If you should have any problems, please feel free to email me here at sgd247@att.net or my alt email at sapphyre@gmx.com with a subject heading of TAG TUT HELP and I will be more than glad to help you out anyway I can!
*Thanks*
Hugz!
§apphyre


No comments:
Post a Comment