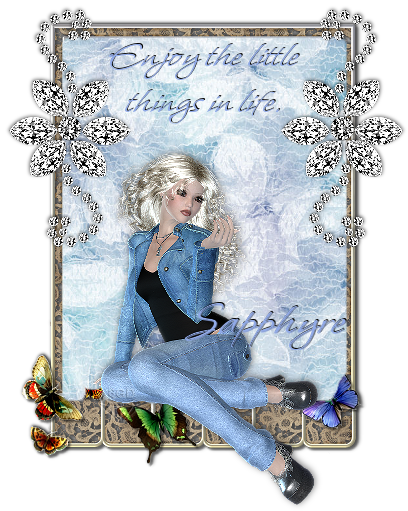
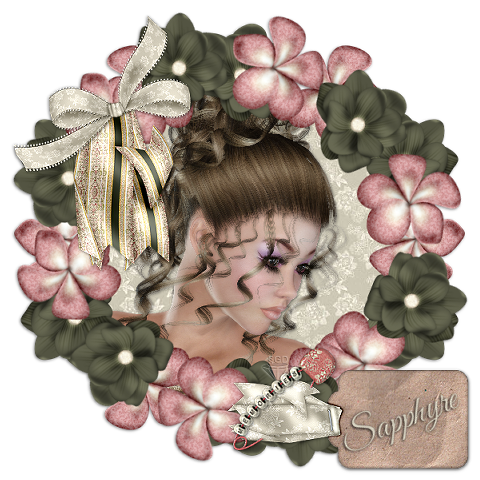
Click tag above to view in full size.
Lost in Day Dreams Tut is ©§GD and was written on Aug. 27, 2009.
This tutorial was written using PSP v 9.01. This tutorial should be compatible with all versions of PSP with few minor adjustments of the tools locations in your version of PSP.
Please DO NOT copy, translate, send thru email or upload this tutorial to another website without written permission from the tutorial writer. Thank You. All ideas steming from this tutorial is of my own and any similarities to others on the web are purely coincidental.
♥ Ok, lets go tag! ♥
Materials Needed for this tutorial are:
Thank you Julie for a fun kit to work with!
♥ My Polaroid Photo Frame
HERE
♥ Mura's Meister Cloud plugin
HERE
Remember to SAVE often!
Unzip your files and open PSP. Minimize your font. Save Mura's Meister plugin filter to your Plugins folder in PSP. Open a new Raster layer 400x400 pixels, Resolution 72.00, Transparent.
Open these tubes from the She Dreams Scrapkit: BNB-paper-8, BNB-flower-1, BNB-lace-doodle-3, and minimize in PSP. Open your Polaroid frame and minimize. Maximize the BNB-lace-doodle-3 tube, right click copy and back to your 400x400 canvas, Right click Paste -- Paste as a New Layer. Go to Image -- Resize 45 percent, Resample Using: Smart Size, Lock Aspect Ratio: Checked. Click OK.
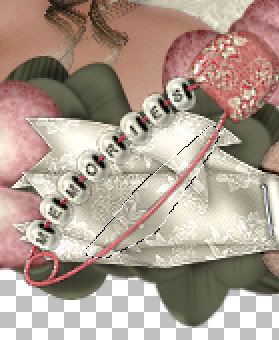
Go to Image -- Rotate -- Free Rotate. Direction: Right, Degrees: 90, click OK. Image -- Flip. Move your lace to the top of the canvas and over to the right side. See screenshot below for placement.
In your Layers Pallette, you should now have a total of 2 layers. Layer 1 is blank and Layer 2 contains your lace. Rename Layer 2 to LACE. Right click on your Lace Layer and Duplicate.Go to Image -- Mirror. Layers -- Merge -- Merge Down.
Right click on your Lace Layer again, and Duplicate. Next, Image -- Flip. Then to Layers -- Merge -- Merge Down. Ok, now we will right click once more on the Lace Layer and Duplicate one last time. This time though, go to Image -- Rotate -- Free Rotate. Direction: Right, Degrees: 90, Click OK. Layers -- Merge -- Merge Down. Now this is what you should now be seeing in your canvas below.
With your Magic Wand Tool, Mode: Replace, Match Mode: RGB Value, Tolerance and Feather: 0, Contiguious: Checked, And Anti-Alias: UNchecked. Click inside the center of your lace frame. Go to Selections -- Modify -- Expand. Expand 5 pixels, click OK. New Raster Layer, name it FRAME BG. Click OK. Maximize your BNB-paper-8 tube. Right click -- Copy. Back to your Lace frame canvas (you should still see the marching ants), Right click -- Paste -- Paste into Selection. DO NOT Deselect yet!
In your Layers Pallette, right click on Frame BG Layer -- Arrange -- Move Down. With your Frame background paper still selected, highlight your Lace layer. Go to Effects -- 3 D Effects -- Cutout. Settings: Vertical: 1, Horizontal: -1, Opacity: 50, Blur: 10.00 and Shadow Color: Black, Fill - Interior is left UNchecked. Click OK. Selections -- Select None.
Maximize your BNB - flower - 1 tube. Shift + D to copy your tube, close the original. Image -- Resize 30 percent. Click OK. Use your Crop Tool to crop down the canvas around your tube. Right click -- Copy. Back to your Lace Frame image, New Raster Layer, name it FLOWER, click OK. Right click on your canvas -- Paste -- Paste As A New Selection. Move your flower to the upper left corner of your lace frame. Left click to place the flower. Selections -- Select None.
Right click on your Flower layer -- Duplicate. Image -- Mirror. Layers -- Merge -- Merge Down. Right click on your Flower layer again -- Duplicate. Image -- Flip. Layers -- Merge -- Merge Down. Make a New Raster Layer, name this layer MID FLOWER. Click OK. Right click on your canvas -- Paste -- Paste As A New Selection. Place this flower in the top center of your lace frame. Left click to place flower. Selections -- Select None. Right click on your Mid Flower Layer -- Duplicate. Image -- Flip. Layers -- Merge -- Merge Down. Right click -- Duplicate. Image -- Rotate-- Free Rotate. Right and 90 degrees. Click OK. Layers -- Merge -- Merge Down.
Now set your lace frame aside, and open up your Polaroid frame. This frame has 2 layers. Highlight the bottom layer and right click -- Copy. You can now cloe out this frame. Open up a new 500x500 pixel transparent image. Right click -- Paste -- Paste As A New Layer. Image -- Resize Same settings as before but change the percentage to 50. Click OK. Move your frame to the top of your canvas. See screenshot below.
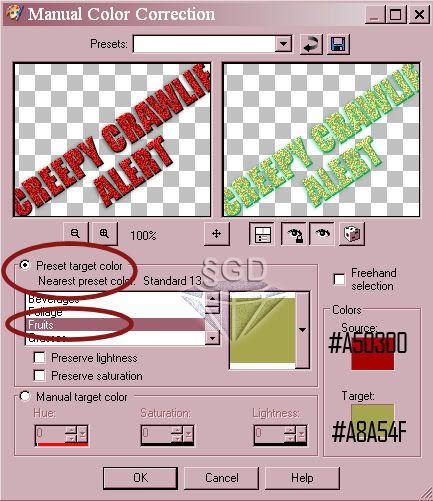
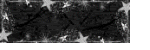
Set your Foreground color to #C2DFF9, your Background color to #FFFFFF. With your Magic Wand, click inside your frame. Selections -- Modify -- Expand. Expand 7 pixels. Click OK. New Raster Layer, name this layer SKY, click OK. Flood fill with your foreground color. DO NOT DESELECT! Effects -- Plugins -- Mura's Meister -- Cloud. Settings: Effect: 100, Amount: 100, Grain: 3, rest are set to zero. Click OK. (See screenshot below if you are unsure of the settings used).

Right click on your Sky Layer. Arrange -- Move Down. Selections -- Select None. Set this frame aside for now. Open up your chosen tube. Back to your Polaroid frame, right click -- Paste -- Paste As A New Layer. Ok, tube is too large, but this is OK, we will be resizing it down. Name this layer in your layer pallette, as TUBE. Right click -- Arrange -- Move Down. Now place your tube centered under your frame to your liking. Highlight your frame layer. With the Magic Wand, click in the center of the frame. Selections -- Modify --Expand 7 pixels, click OK. Selections -- Invert. Highlight your Tube layer again and press Delete key one time. Selections -- Select None. Layers -- Merge Visible.
Right click -- Cut. Right Click -- Paste -- Paste As A New Layer. This will center your frame. Layers -- Merge -- Merge Visible. Right click -- Duplicate. Image -- Rotate -- Free Rotate. Rotate to the Right and 25 degrees. Click OK. Right click on your rotated layer, Duplicate. Image -- Mirror. Now click on your original fram elayer (should be showing up as the bottom layer). Right click -- Arrange -- Bring To Top. Now we will give each layer a Drop Shadow. Effects -- 3 D Effects -- Dropshadow. Settings: Vertical / Horizontal: both set to 1, Opacity: 50, Blur: 10.00, Color: black, click OK. Layers -- Merge -- Merge Visible. Now Crop down your image.
Right click on your Polaroid frame -- Copy. You can now close out this image. Back to your Lace frame image. Find your layer called Frame BG. Highlight your Frame BG layer. New Raster Layer, name it PHOTOS. Right click -- Paste -- Paste As A New Selection.Place your Polaroid photos in the center of your Lace Frame.Left click once to set photos in place.. Set your frame aside and open up your tube of choice. Right click -- Copy. Back to your Lace Frame image. Right click and Paste as a new layer. Arrange -- Bring To Top. Image -- Resize your tube, here I did mine at 53 percent, all layers-- unchecked. Move your tube into place along the left side of your lace frame. Effects -- 3 D Effects -- Dropshadow. Vertical / Horizontal: both set to 1, Opacity: 100, Blur: 10.00, and color: black. Click OK.
Set Foreground to #C67E89, Background to #FFFFFF. New Raster Layer, label it TEXT. Click OK. Here I used the Pristina font set to size 36, stroke 1.0. Add your tag message. Click Apply. Center your text to where you want it. Apply Dropshadow. Settings: Vertical / Horizontal: both set to 1, Opacity: 100, Blur: 5.00 and color: Black. Click OK. At this point, you can go to Layers -- Merge -- Merge Visible and save as a .png file and save it to use at a later time if you choose to tag this tag with other names, etc.
Continuing on with your personalized tag: New Raster Layer, name this with your name. Add your name to this layer, depending on the length of your name, you can adjust the size of the chosen font. Here I used size 48 with the font Pristina for my tag. Click Apply. Dropshadow same as in step 18.
New Raster layer, here add in your copyrights for tubes used.
New Raster layer, add in your watermark.
Save your finished tag! This is how I save a .png file.
File -- Export -- PNG Optimizer.
Here you will see different tabs / settings. These are just the settings I use.
Colors Tab: 16.7 Million Colors
Transparency Tab: Alpha Channel Transparency
Areas to be transparent? Existing image or layer transparency.
Gamma Tab: I leave this as is.
Format Tab: Non-Interlaced
Click OK.
I hope you have enjoyed my first tag tutorial and hope you will be back soon! If you have any questions, please email me here at
sapphyre@gmx.com with
Tag Tut Help in the subject line. Please send me your completed results, I'd LOVE to see what you made!
*hugz*
§apphyre