
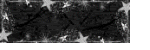
Click above to view in full size.
Angels Watching Over You ©§GD on September 27, 2009
Materials needed:
PSP you can get a trial version HERE ( I used 9 but should be able to be used for all versions with slight tool locations varying from mine).
Angels & Fairies Kit by Julie aka Bits 'N' Bobs.
Font of Choice
Angels & Fairies kit pieces I used for this tutorial:
bnb-cloud-1
bnb-paper-7
bnb-branch-2
bnb-branch-1
bnb-butterfly-4
bnb-angel-6
bnb-heart charm-4
bnb-bow-4
Remember to SAVE along the way, as I won't be reminding :)
♥ Let's Tag! ♥
Step 1: Open up all of your needed pieces, minimize in PSP. Open a new 500x500 pixel, transparent canvas. Rename this layer as canvas.
Step 2: Maximize your bnb-branch-1 image. Copy close out the original, Paste as a new layer onto your 500x500 canvas. Rename this layer as vine frame. Resize 50%. Duplicate. Mirror. Duplicate.Flip. Duplicate. Mirror. Hide your canvas layer, Layers Merge Visible. Unhide your canvas layer. Rename your merged layer as vine frame.
Step 3: Maximize your bnb-branch-2 image. Copy, close out the original. Paste as a new layer on your canvas. Resize 75%. Rotate Right 45. Line it up to the side of your vine frame, duplicate, mirror. Hide all layers except the stick layer you just created and the vine frame layer. Layers, merge visible. Rename to frame.
Step 4: Maximize your bnb-paper-7. Copy, close out the original. Paste as a new layer on your canvas. Right click on this layer in your layer pallette, Arrange, send to bottom. Click on the outside of your frame, highlight your paper layer in the layer pallette and hit the delete key one time.
Step 5: Maximize your bnb-cloud-1 image. Copy, close out the original, paste as a new layer. With your mover tool, move the clouds to the bottom of your frame image under the paper layer. Duplicate, image, flip. Merge the two cloud layers together and rename this layer to clouds.
Step 6: Maximize your bnb-butterfly-4 image. Copy, close out original. Paste as a new layer at the top of your layer pallette. Resize 75% and place to the top left of your frame. Rename this layer butterfly.
Step 7: Maximize your bnb-heart charm-4 image. Copy, close original, paste as a new layer, resize 50%, image mirror. Adjust sharpness, sharpen. Place on the right side of your frame towards the top (see tag for placement).
Step 8: Maximize your bnb-bow-4 image. Resize 50%, rotate to the right 45. Place at the top right hand side of your frame just slightly over the top of your heart charm's string. (See tag for placement).
Step 9: Maximize your bnb-angel-6 image. Copy, close out the original. Paste as a new layer. Resize 75%, adjust sharpness, sharpen. Move your angel towards the bottom left of your frame.
Step 10: Give each of your picture tube layers a drop shadow: Vertical: 1, Horizontal: -1, Opacity: 50, Blur: 10, and color: Black (#000000), Shadow on new layer: UNchecked. Click OK.
Step 11: With your font of choice, type in a message on a new raster layer adjusting your size of text to accomodate the inside of the frame area. Here I used Curlz MT Bold. Give your message the same drop shadow as Step 10.
Step 12: New raster layer, add your watermark, and any copyright info you may need to add. Adjust your blend mode to your liking. Layers merge all visible. Resize by 80%. Adjust sharpness, sharpen.
Step 13: * Optional * You can stop here at this step by saving your completely merged visible tag as a .png file. I use these settings for a .png file:
Colors Tab: 16.7 Million Colors (24 Bit)
Transpareny Tab: Alpha Channel Transparency and Existing image or transparency
Gamma Tab: Left as is
Format Tab: Non-Interlaced
Download Times Tab: left as is
Click OK.
Give your new tag template as I call it at this phase, a name. Now you can use this tag over and over and make many with different names!
Step 14: Add your name to a new raster layer. Same drop shadow as in Step 10.
Yay! You are done! Enjoy your new tag! Thanks for trying out my tutorial. If you should have any problems or any questions regarding this tutorial, please email at sgd247@att.net or sapphyre@gmx.com with a subject heading of Tag Tut Help. I hope you have enjoyed this tutorial. Until next time...Happy PSP-ing!
*Hugz*
§apphyre


No comments:
Post a Comment